Integrative Scanner Technology.
Navigation Bar
     
Action Manager Guide  
Page 1 of 2 Page 2 of 2

Scan & Save Action

Scan & Save reduces the time it takes to open an image-editing application whenever you want to scan. This concept is also good for creating a directory of invoices, receipts or checks. To set up the Scan & Save Action, please perform the following:


Figure 8. Scan & Save dialog box.

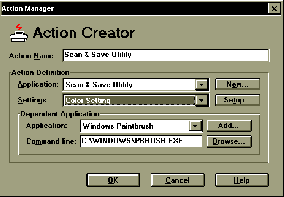
1.Using your mouse's right button, click an available UNDEFINED icon from within Action Manager.

2.Enter an Action Name within the Action Name field. For example, if you are scanning to PhotoMagic, type in PhotoMagic as the Action Name.

3.Under the heading Action Definition and inside the Application field, choose the SCAN & SAVE ACTION as the application (see Figure 9 below).

4.Within Settings, choose the appropriate setting: either B/W, GRAY (DEFAULT) or HALFTONE. Ifyou have a color scanner, choose the COLOR setting file.

5.Under the heading Dependent Application, choose the imaging program where you want to scan to. Note: Windows Paint is set as the default (see Figure 9).


Figure 9. Setting up the Scan & Save Action

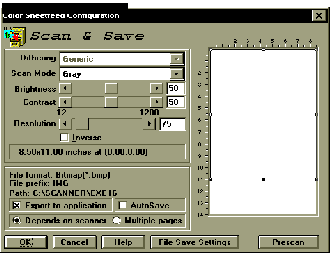
6. Choose SETUP to the right of Settings to set the Scan Mode, Scanning Area, Resolution, Brightness and Contrast (see Figure 13).


Figure 13. Scan & Save imaging options dialog.

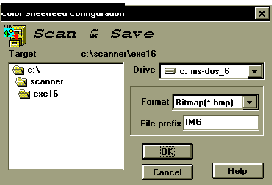
7. After you've selected the correct Scan Mode and Resolution, choose FILE SAVE SETTINGS located to the right of the HELP button.

8. Inside the File Save Settings dialog box (see Figure 14), choose the drive and directory where you want to save your scans.

9. Choose the File Prefix and file Format. Note: Scan & Save only supports BMP, PCX and TIF image formats. If you're scanning to Windows Paint choose the file format as BMP.

10. After designating a different Drive, Target directory, File Format and File Prefix, click OK to save the changes. If the below predefined options don't need changing, click CANCEL.


Figure 14. File Save Setting dialog box.

11. Click OK to reenter Action Creator

12. Click OK to reenter Action Manager.

13. Put a picture into your scanner and double-click the Scan & Save Action to run it.


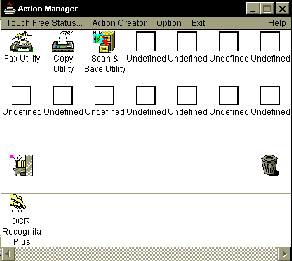
The following sections describe how to operate Action Manager. Please open Action Manager now and follow along to learn how to file actions, delete actions and set up a Touch-Free Status.

Filing Actions within Action Manager

The Filing cabinet, located at the bottom left of Action Manager (see figure 15) is for storing unused actions. To put an action in to the Filing cabinet, choose it with your left mouse button and drag to the Filing cabinet and drop. To view the contents of the Filing cabinet, single click on it. Note: To run a filed action, you must first drag it back to an UNDEFINED icon inside Action Manager.


Figure 15. Filing Actions


Deleting Actions

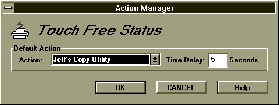
To delete an action, choose an action with your left mouse button and drag it to the garbage can and drop (see Garbage Can, Figure 15). Note: Once you drop an action into the garbage can, it's deleted from Action Manager and your hard disk.


Touch-free Scanning

After you've set up all your actions you can set up the Touch-Free Status to automatically run an action after a set period of time. To create a Touch-Free action, perform the following.

1.Single click Touch-Free Action Status menu item located on the Action Manager menu bar (Figure 16).


Figure 16. Setting up a Touch Free Status

2. Choose which Default Action you wish to perform. For example, if you want to perform copying, choose the appropriate COPY Action.

3. Next, choose the Time Delay. The Time Delay is the amount of time before the Default Action begins to scan after Action Manager pops-up.

4. Choose OK.

5. Minimize Action Manager by clicking on the downward arrow located at the upper-right of Action
Manager. Important: Closing Action Manager will disconnect it from the scanner!

Attention

About Operation: Action Manager automatically pops-up after you insert a document into your
sheetfed scanner. You must have Action Manager open and minimized for it to pop-up. After Action Manager pops-up, the Time Delay will begin to count down (4, 3, 2,...). If you have a flatbed scanner, as seen below, you must press the button located at the front of the scanner to begin the Time Delay countdown.

Back to the Top

About Paper Aware (sheetfed scanners only)

If you have a Plustek Flatbed scanner, please skip this section. Paper Aware contains 2 boxes: Disable and Enable, and when an application is inside the Disabled window, you will stop Action Manager from popping-up while you're inside that application (e.g., image editing or OCR).

To set up Paper Aware, please perform the following:

1.Open the application you don't want Action Manager to pop-up in and minimize it.
2.Within Action Manager, click the Options menu and PAPER AWARE.
3.Using the arrow keys between the DISABLE and ENABLE boxes, move the application from the
ENABLE box to the DISABLE box (see Figure 17).
4.Choose OK when done.


Figure 17. Disabling Action Manager's Paper Sense option

5. Enter the application that you disabled and enter a document into your scanner. If Action Manager does not pop-up, then you it has been properly disabled.

Back to the Top

GLOSSARY

Action

A process that involves either faxing, copying, performing OCR or scanning. An Action is modified or created inside the Action Creator.

Application

A software program that lets users perform a task or set of tasks.

Brightness

A setting to determine the brightness of light projected by the scanner onto the page being scanned. This lightens or darkens the resulting image. Brightening a page that has tightly spaced characters can improve the recognition.

Compression

Removing redundant data from a file in a way that the original file can later be completely reconstructed. The resulting compressed file requires less disk space than the original.

Crop

A method of eliminating an undesirable region of a document or picture.

Dialog Box

In Microsoft Windows, a window that interacts with the user.

Dither

A method of varying patterns of dots (a dithered pattern ) to simulate a grayscale. In a dither pattern, areas which are black will have more darker dots. Lighter areas will have fewer dots.

DPI (Dots Per Inch) see Resolution.

Drop Down List Box

Clicking on the menu opens a list screen that drops down from the selected item, allowing you to select from a list of items.

Driver

Enables a computer to communicate with special hardware devices (such as a scanner).

Extension

The period and characters that succeed a filename. For example: TIFF, BMP and PCX are common image file extensions.

File Type

A format used to define a file.

Grayscale

An image stored with 8 bits per pixel (256 shades of gray) that can be displayed or printed in shades of gray. Grayscale images require more disk space than a black & white image.

Halftone

An image made up of black dots spaced to simulate different gray tones of the original image.

Icon

A visual representation of an object. In Microsoft Windows, each application program is represented by an icon.

Inverse

Inverse reverses the colors of an image; black pixels for example, will change to white and white pixels will change to black.

Line Art

An image composed of lines that are black and white, and do not contain continuous tones.

Mode

The method used to scan, either Line-Art, Grayscale or Halftone.

OCR (Optical Character Recognition)

A technology in which binary images of character shapes are analyzed and identified as characters and output to editable text.

Prescan

A process that enables you to zone (choose a portion of a document), and preview a document or picture before scanning.

Resolution

The degree of detail in dots per inch (dpi); the higher the resolution, the more information will be scanned from the page image. Higher resolution images also require more disk space for storage.

Setting File

A file that contains Action settings, including type quality, image source, printer type, fax settings and resolution.

TWAIN

An image and scanner interface standard used for scanner and image program development.

Zone (Margin Handles)

A rectangular boundary that surrounds an area of text or an image. Zones can be defined by performing a prescan and then setting the area you wish to recognize.

Back to the Top

Troubleshooting

Most problems are easily solved, and some of the most common questions and their recommended solutions are listed below.

Symptom Possible Solutions
Copy Action: Unable to write to disk
  • Do you have 100 Megabytes of available hard disk space? The Copy Action makes the scanner scan at the same resolution as your printer. For example, a 300 dpi color copy needs approximately 680,000,000 bytes of hard disk space
  • Decrease the resolution of your printer from 1200 to 600, 600 to 300, or 300 to 150.
  • Set up the Scan & Save Action to scan a 300 dpi B/W image to your image-editing software. Once the image is displayed, choose FILE and PRINT.
Fax Action does not function with your fax software
  • Make sure that your fax software is properly installed and you have the correct fax driver chosen inside the ADVANCED Fax Action SETUP.
  • Use MS Fax as the default faxing software for Fax Action
OCR is not reading documents, or gibberish is the output.
  • Make sure that document that you're trying to recognize is a type written document without multiple columns and pictures. OCR likes documents that consist of only type written text!
  • Is the document skewed, or slanted? If so, make sure that it's aligned straight.
  • Check the brightness. Increase the brightness when scanning documents that contain light characters, and decrease the brightness on documents that have dark bold characters.
  • OCR does not recognize handwritten characters! To recognize hand written characters, you need to purchase an ICR program.
  • Make sure that the document you're trying to recognize is not upside down.
Scan & Save does not open image-editing program ? Edit the Scan & Save action by clicking it with your left mouse button. Click set up and check all setting to make sure they're properly set. Click OK when exiting the SETUP dialog box.

?Make sure that the proper path is entered inside the Action Creator under the heading Dependent Application.

Back to the Top

| What's New | Where to Buy | News & Features | Reseller Information | Product Registration |
Table of Contents
Contact with any questions or comments concerning this site.
?1998 Plustek USA, Inc. All Rights Reserved.